I have been asked a couple of times if I do sell my quilts. The answer is, yes I do, I just make them cos I enjoy making them really. I've got all the ones I need, I just love making them lol.
Anyway, I do sell either via ebay or via my selling page on Facebook (no ebay fees that way lol).
You are welcome to have a look at either, and I'm very happy to answer any questions etc.
The link Facebook is My Facebook Selling Page You're also very welcome to add me as a friend on facebook as well. You should be able to find me Deborah Lane.
My ebay stuff is located at My ebay page
Just finishing off a blue quilt at the moment, but been at the beach with the boys today, had a lovely day, a bit pink, but fun just the same. My bed is calling me now though, that sea air has done its stuff!

Monday, 23 July 2012

Friday, 20 July 2012
Mini Knitting & Quilts Again!
Been quite a busy week really, don't seem to have been at home very much which makes a nice change!
Oh dear the dreaded Summer holidays have started today as well, 2 teenage boys one of whom is autistic as well, are going to make for an interesting 6 weeks lol.
Had the dog groomer over on Tuesday so the dogs are looking and smelling a bit better now. I've got a pic of Sophie the westie, but Berry absolutely hates the camera and ends up hiding from it, she's also very black so she never photographs well either, plus she'll just keep backing away!

Here she is just chilling after her haircut!
Onto mini-ing, have done a little bit of knitting, made quite a cute jumper with a rabbit on the front which I sent to my dear friend Paula as I know she loves rabbits, unfortunately I forgot to take a pic of it before I sent it. I really wasn't too sure about it, it ended up facing the opposite way that I intended, but I don't think it was too bad for a first attempt! Will have a go at making a couple more and see if I like them any better. Also did a little mini set for a dollshouse lady which I quite like as well. But I'm easily bored and ended up making another quilt! I am definitely addicted to them! This one is much more subdued that my usual ones, I've decided it's an autumnal one! Have already sorted out the next lot of material which will be a darkish blue flavour one. Then back to my favourites of Cath Kidston and florally ones. But I must remember that I still have more nativity sets to make as well, must not get carried away too much with the quilts! I must put them on ebay as well, I keep meaning to, but then keep forgetting!
Right here's the piccies. Will have some other housey pics to show you next week, Paula's daughter, Bethany has made me some new signs, one for the shabby shop and one for Cove Cottage, which I will reveal next week. I've had a sneak preview of them and they are absolutely gorgeous as usual. That certainly is one talented family!
Anyway here are the pics of the mini ladies set and the newest mini quilt.


Oh dear the dreaded Summer holidays have started today as well, 2 teenage boys one of whom is autistic as well, are going to make for an interesting 6 weeks lol.
Had the dog groomer over on Tuesday so the dogs are looking and smelling a bit better now. I've got a pic of Sophie the westie, but Berry absolutely hates the camera and ends up hiding from it, she's also very black so she never photographs well either, plus she'll just keep backing away!

Here she is just chilling after her haircut!
Onto mini-ing, have done a little bit of knitting, made quite a cute jumper with a rabbit on the front which I sent to my dear friend Paula as I know she loves rabbits, unfortunately I forgot to take a pic of it before I sent it. I really wasn't too sure about it, it ended up facing the opposite way that I intended, but I don't think it was too bad for a first attempt! Will have a go at making a couple more and see if I like them any better. Also did a little mini set for a dollshouse lady which I quite like as well. But I'm easily bored and ended up making another quilt! I am definitely addicted to them! This one is much more subdued that my usual ones, I've decided it's an autumnal one! Have already sorted out the next lot of material which will be a darkish blue flavour one. Then back to my favourites of Cath Kidston and florally ones. But I must remember that I still have more nativity sets to make as well, must not get carried away too much with the quilts! I must put them on ebay as well, I keep meaning to, but then keep forgetting!
Right here's the piccies. Will have some other housey pics to show you next week, Paula's daughter, Bethany has made me some new signs, one for the shabby shop and one for Cove Cottage, which I will reveal next week. I've had a sneak preview of them and they are absolutely gorgeous as usual. That certainly is one talented family!
Anyway here are the pics of the mini ladies set and the newest mini quilt.


Saturday, 14 July 2012
Cath Kidston Mini Patchwork
At the moment I seem to be obsessed with mini patchworks! Completed another one this evening, made out of Cath Kidston fabrics, I do love her fabrics!


My poor fingers are sore now though lol, think I've done too many! Even with a thimble I always seem to catch the skin, or more recently keep piercing my thumbnail lol.
I'd really like to do a green theme patchwork next as I've not done green yet and have sorted out some green fabrics, but think my fingers are too sore and my eyes are too tired to do another one yet, we shall see tomorrow!
If I don't do another quilt think it will have to be some more mini knitting! Not done any for a little while, so will make a change, then will have to go back to the nativity knitting.
Still waiting for some more things for Lobster bathroom, but they won't be coming till the end of next week now as the lady I ordered them from forget to tell me she was going on holiday for 2 weeks lol.
I shall have to find some projects to do for my own houses, just I seem to have run out of ideas! Meanwhile I shall keep making things to sell so that when I do see something I like I can buy it! Waiting for free listing on ebay but i've either missed them or there just haven't been any. Got all these mini quilts to sell now lol, plus a few other bits and pieces and no doubt will be more mini knitting as well! Come on ebay!


My poor fingers are sore now though lol, think I've done too many! Even with a thimble I always seem to catch the skin, or more recently keep piercing my thumbnail lol.
I'd really like to do a green theme patchwork next as I've not done green yet and have sorted out some green fabrics, but think my fingers are too sore and my eyes are too tired to do another one yet, we shall see tomorrow!
If I don't do another quilt think it will have to be some more mini knitting! Not done any for a little while, so will make a change, then will have to go back to the nativity knitting.
Still waiting for some more things for Lobster bathroom, but they won't be coming till the end of next week now as the lady I ordered them from forget to tell me she was going on holiday for 2 weeks lol.
I shall have to find some projects to do for my own houses, just I seem to have run out of ideas! Meanwhile I shall keep making things to sell so that when I do see something I like I can buy it! Waiting for free listing on ebay but i've either missed them or there just haven't been any. Got all these mini quilts to sell now lol, plus a few other bits and pieces and no doubt will be more mini knitting as well! Come on ebay!
Friday, 13 July 2012
Lobster, Cove & Patchwork
My little wicker chair arrived this morning from Rose at Cute and Crafties, I have to say I absolutely love it! Really is beautifully made and perfect in every way. It has now found it's way into Lobster Pot Cottage bathroom. I'm still waiting for some things for the bathroom to arrive, no sign of them yet, think I will have to enquire where they are, I'm getting impatient!
Finally got round to taking the pictures of the new Cove Cottage sign made for me by the talented Julie (cottagekitty), she really is so talented and I love her signs and they always look perfect on Julie Bennett's cottages as well.
Have taken a few pics of both Cove and Lobster as I have been adding things slowly but surely!
Also finished another blue mini quilt, not sure what I am doing with them all, or why I'm making them apart from the fact that I enjoy it. Think they will all end up on ebay as I have far too many quilts and nowhere to put them lol.
Weather was nice this morning, but it's looking decidedly black up there again so reckon we are in for some more rain!


 Anyway, here are the latest pics
Finally got round to taking the pictures of the new Cove Cottage sign made for me by the talented Julie (cottagekitty), she really is so talented and I love her signs and they always look perfect on Julie Bennett's cottages as well.
Have taken a few pics of both Cove and Lobster as I have been adding things slowly but surely!
Also finished another blue mini quilt, not sure what I am doing with them all, or why I'm making them apart from the fact that I enjoy it. Think they will all end up on ebay as I have far too many quilts and nowhere to put them lol.
Weather was nice this morning, but it's looking decidedly black up there again so reckon we are in for some more rain!


Wednesday, 11 July 2012
Is It Really July!
I can't believe it's July already! Although weatherwise you'd have a hard job guessing it was Summer! Today seems to be about the first day in months that we've had a sunny day, I've even managed to go out and cut the grass.
The Olympic torch came to town today as well, the boys had the day off school, and went down and watched although they couldn't see much lol.
Haven't really done much mini-ing, am waiting for a few bits from ebay and a wicker chair from Rose from Cute and Crafties, hopefully will all be here by the weekend and I shall be able to put some piccies on of Cove Cottage (along with it's new lovely sign made by Julie (cottage kitty)) and the few bits I've added to Cove and Lobster. Poor Driftwood and Boathouse do seem to have been neglected recently!
Oh I seem to have a new resident of the Shabby Shop (still unamed), as you can see from this pic!

She seems to have taken up residence!
To follow on from my quilt tutorial, I finally got round to finishing the little quilt I started. I seem to have been knitting nativity stuff for ages, I forgot how long the sets take to complete, but I wanted to get a head start ready for, dare I say it, Christmas!
So here's the new mini quilts, I seem to have quite a few sitting in the cupboard now, 4 in total I think, 3 of mine and 1 I bought from someone else but no longer use. I must get them on ebay! I am already thinking about the next one, I really do enjoy doing them, just deciding what to do next, either another Cath Kidston fabric one, or a blue one or a green one, or even a any colour goes one! Shall have to have a look through my bag of materials and see what grabs me!
Anyway I'm waffling on again as per usual, here's the finished quilt


The Olympic torch came to town today as well, the boys had the day off school, and went down and watched although they couldn't see much lol.
Haven't really done much mini-ing, am waiting for a few bits from ebay and a wicker chair from Rose from Cute and Crafties, hopefully will all be here by the weekend and I shall be able to put some piccies on of Cove Cottage (along with it's new lovely sign made by Julie (cottage kitty)) and the few bits I've added to Cove and Lobster. Poor Driftwood and Boathouse do seem to have been neglected recently!
Oh I seem to have a new resident of the Shabby Shop (still unamed), as you can see from this pic!

She seems to have taken up residence!
To follow on from my quilt tutorial, I finally got round to finishing the little quilt I started. I seem to have been knitting nativity stuff for ages, I forgot how long the sets take to complete, but I wanted to get a head start ready for, dare I say it, Christmas!
So here's the new mini quilts, I seem to have quite a few sitting in the cupboard now, 4 in total I think, 3 of mine and 1 I bought from someone else but no longer use. I must get them on ebay! I am already thinking about the next one, I really do enjoy doing them, just deciding what to do next, either another Cath Kidston fabric one, or a blue one or a green one, or even a any colour goes one! Shall have to have a look through my bag of materials and see what grabs me!
Anyway I'm waffling on again as per usual, here's the finished quilt


Friday, 29 June 2012
Mini Patchwork Quilt Tutorial
I have been asked to do a little guide on how to make mini patchworks. This is my first tutorial so it may be lacking lol.
Anyway to begin
Firstly decide what size quilt, patches and shape you want. I would recommend for a beginner that you use a square patch rather than hexagonal as it gives you a nice straight edge at the end.
I usually use either 1cm squares or have now started using 1 inch squares which are a lot easier and quicker to work with, so we will use 1 inch squares for this. You will need to decide how big your finished quilt will be. With the larger patches I use 7 x 7 inches, or 9 by 9, but as 7 inches fits the width of the graph paper I would suggest you start with these.
Visit this site http://incompetech.com/graphpaper/ where you will be able to make and print your graph paper. Just select the A4 and 1 inch in squares, then print it off. If you want to do a rigid design you may want to run 2 sheets off, 1 to cut up and 1 to make your design on, I have to say I never bother with this as mine are always pretty random!

Anyway, once you've printed your graph paper, cut it into all the individual squares that you need. Also make a cardboard template slightly bigger than one of the squares to use as a guide for the material squares which will be bigger than the paper patches.
Using the larger template begin to cut out the squares of fabric, they don't need to be 100% accurate as they will be folded over the paper patches so don't worry if they're not perfectly straight and square.
You will end up with a large pile of patches and papers
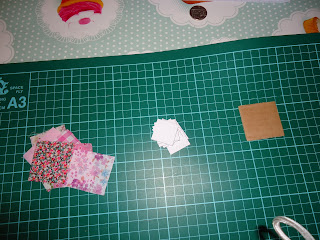
Next it's time to tack the papers and fabric together. I know other people that use other methods which are quicker but I've never found them successful but that's probably just me, so feel free to try them. One way is to spray starch the fabric and fold it over the patches. Another way is to glue stick the paper patches and fold the fabric over. I have to say they've never worked for me, so I go to the more laborious route of tacking! Just roughly tack (with a completely different colour thread to make it easier when removing), folding over a small amount as you go. They really do only need to be tacked with a few stitches, just to keep the corners down.

So now you should end up with a whole pile of tacked patches. Now it's time to begin sewing them together. Place 2 patches right sides together and using a colour thread that will blend in, begin oversewing on the very edge, trying not to sew the papers inside the patches, not easy and it isn't a disaster if you do catch the edge of the papers. To start off just do a few oversewing stitches just to secure the thread, then work along the edge of the patch, try and get as many patches sewn together using the same thread, if you're doing a random patchwork you can get quite a few. You can always do a couple of stitches back the other way to join another patch, just saves keep breaking the thread. When you come near the end of the thread just do a couple of stitches together to secure it.

The quilt comes together quite quickly at this stage and you'll end up with patches together something like this
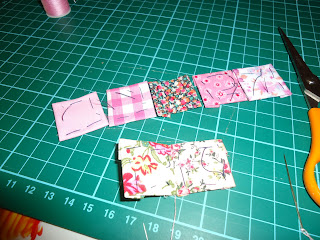

When you've got them all sewn together to the size you want, it's time to get the iron out!
Give the quilt a quick iron, just to reinforce the folded corners really. Now it's time to take the tacking and papers out. This is fiddly but persrvere! It does make a mess with bits of cotton everywhere! But the end is in sight. When I've got the papers and tacking out I give it a very quick iron just to smooth it all out and keep those corners folded in.
You now have a nearly finished quilt!
To finish it, again there are many methods! I don't use any wadding in mini quilts as it makes them a bit too stiff. A very simple way is to just cut another piece of material the same size as your finished quilt and right sides together sew them together, just leaving enough room to turn it right side out and then ladder stitch the opening together.
The method I use, I found here. Rather than writing it all again, just visit this blog. It's for a full size quilt but it's exactly the same for a mini quilt, just easier and smaller! Just adjust the amount of fabric needed for the turnover, you won't need much as the quilt is quite small.
http://prudentbaby.com/2011/11/by-craft/the-easiest-cheat-for-binding-a-quilt/
and also a quickie on invisible ladder stitch
http://turningturning.com/tutorial-invisible-ladder-stitch-for-quilt-binding/
This is the method I usually use on my mini quilts. If you have used hexagons you will need to make sure that the edge is big enough to cover the spaces between the edge hexes. Another way for hexagons is to applique them onto another piece of fabric and then use one of the methods to join it together.
Alternatively, you can also use the very pretty bias binding that is available or plain binding to join the front and back together, again using an invisible ladder stitch. You can make your own bias binding type edging as well just by cutting strips of material.
Anyway you should end up with a finished quilt that looks a bit like this

Honestly it is a lot easier than it sounds, and once you've started you won't be able to stop!
Hope you find this guide helpful and feel free to ask questions or to suggest ways of improving it! I'm a novice and not sure how it will work for you!
Anyway to begin
Firstly decide what size quilt, patches and shape you want. I would recommend for a beginner that you use a square patch rather than hexagonal as it gives you a nice straight edge at the end.
I usually use either 1cm squares or have now started using 1 inch squares which are a lot easier and quicker to work with, so we will use 1 inch squares for this. You will need to decide how big your finished quilt will be. With the larger patches I use 7 x 7 inches, or 9 by 9, but as 7 inches fits the width of the graph paper I would suggest you start with these.
Visit this site http://incompetech.com/graphpaper/ where you will be able to make and print your graph paper. Just select the A4 and 1 inch in squares, then print it off. If you want to do a rigid design you may want to run 2 sheets off, 1 to cut up and 1 to make your design on, I have to say I never bother with this as mine are always pretty random!

Anyway, once you've printed your graph paper, cut it into all the individual squares that you need. Also make a cardboard template slightly bigger than one of the squares to use as a guide for the material squares which will be bigger than the paper patches.
Using the larger template begin to cut out the squares of fabric, they don't need to be 100% accurate as they will be folded over the paper patches so don't worry if they're not perfectly straight and square.
You will end up with a large pile of patches and papers

Next it's time to tack the papers and fabric together. I know other people that use other methods which are quicker but I've never found them successful but that's probably just me, so feel free to try them. One way is to spray starch the fabric and fold it over the patches. Another way is to glue stick the paper patches and fold the fabric over. I have to say they've never worked for me, so I go to the more laborious route of tacking! Just roughly tack (with a completely different colour thread to make it easier when removing), folding over a small amount as you go. They really do only need to be tacked with a few stitches, just to keep the corners down.

So now you should end up with a whole pile of tacked patches. Now it's time to begin sewing them together. Place 2 patches right sides together and using a colour thread that will blend in, begin oversewing on the very edge, trying not to sew the papers inside the patches, not easy and it isn't a disaster if you do catch the edge of the papers. To start off just do a few oversewing stitches just to secure the thread, then work along the edge of the patch, try and get as many patches sewn together using the same thread, if you're doing a random patchwork you can get quite a few. You can always do a couple of stitches back the other way to join another patch, just saves keep breaking the thread. When you come near the end of the thread just do a couple of stitches together to secure it.

The quilt comes together quite quickly at this stage and you'll end up with patches together something like this


When you've got them all sewn together to the size you want, it's time to get the iron out!
Give the quilt a quick iron, just to reinforce the folded corners really. Now it's time to take the tacking and papers out. This is fiddly but persrvere! It does make a mess with bits of cotton everywhere! But the end is in sight. When I've got the papers and tacking out I give it a very quick iron just to smooth it all out and keep those corners folded in.
You now have a nearly finished quilt!
To finish it, again there are many methods! I don't use any wadding in mini quilts as it makes them a bit too stiff. A very simple way is to just cut another piece of material the same size as your finished quilt and right sides together sew them together, just leaving enough room to turn it right side out and then ladder stitch the opening together.
The method I use, I found here. Rather than writing it all again, just visit this blog. It's for a full size quilt but it's exactly the same for a mini quilt, just easier and smaller! Just adjust the amount of fabric needed for the turnover, you won't need much as the quilt is quite small.
http://prudentbaby.com/2011/11/by-craft/the-easiest-cheat-for-binding-a-quilt/
and also a quickie on invisible ladder stitch
http://turningturning.com/tutorial-invisible-ladder-stitch-for-quilt-binding/
This is the method I usually use on my mini quilts. If you have used hexagons you will need to make sure that the edge is big enough to cover the spaces between the edge hexes. Another way for hexagons is to applique them onto another piece of fabric and then use one of the methods to join it together.
Alternatively, you can also use the very pretty bias binding that is available or plain binding to join the front and back together, again using an invisible ladder stitch. You can make your own bias binding type edging as well just by cutting strips of material.
Anyway you should end up with a finished quilt that looks a bit like this
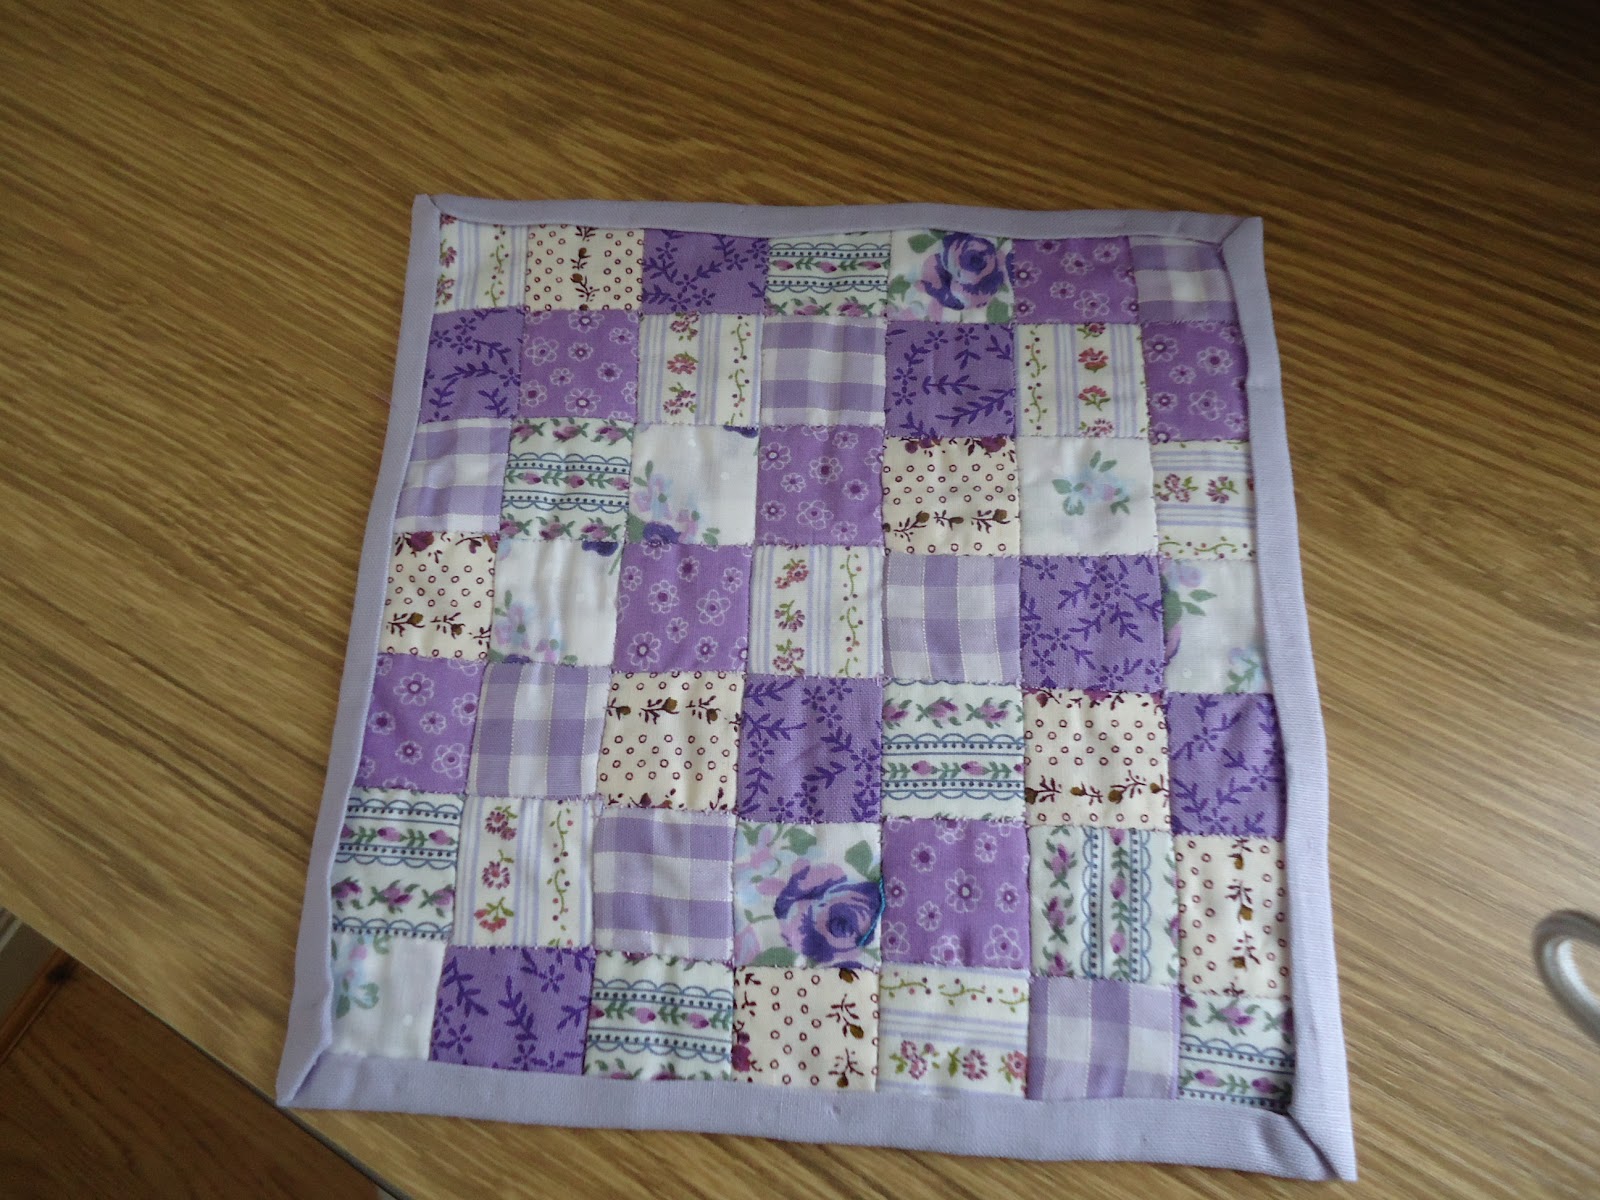
Honestly it is a lot easier than it sounds, and once you've started you won't be able to stop!
Hope you find this guide helpful and feel free to ask questions or to suggest ways of improving it! I'm a novice and not sure how it will work for you!
Monday, 25 June 2012
Mini Quilt and Mini Knits
Have had a busy weekend knitting and patching!
Firstly made a few little baby dresses for my friend Sylvia, they're not for dollshouse babies, but for twin baby mice lol.
Then decided to have a go at making another patchwork quilt, but using bigger patches this time. I still think it's a bit big, but it probably looks so different to the little tiny ones I do, I may get used to it.
Not really done that much else, have got a few bits and pieces to put around different places, but they've just sat in the box since Saturday, need to find my stash of beads etc., (and I can't think where i've put them lol) as well, got a few bits for Lobster's bedroom and a couple more bits for the shabby shop, but nothing terribly exciting, just bits and pieces really.
Anyway, here are the little dresses and the new quilt


Firstly made a few little baby dresses for my friend Sylvia, they're not for dollshouse babies, but for twin baby mice lol.
Then decided to have a go at making another patchwork quilt, but using bigger patches this time. I still think it's a bit big, but it probably looks so different to the little tiny ones I do, I may get used to it.
Not really done that much else, have got a few bits and pieces to put around different places, but they've just sat in the box since Saturday, need to find my stash of beads etc., (and I can't think where i've put them lol) as well, got a few bits for Lobster's bedroom and a couple more bits for the shabby shop, but nothing terribly exciting, just bits and pieces really.
Anyway, here are the little dresses and the new quilt


Subscribe to:
Posts (Atom)